Gateway configuration
Add, view, and manage Asset Gateways on the Gateway configuration page. Asset Gateways function like IoT Gateways, rather than as traditional network gateways. A network scan on the Inbox page requires an onboarded Asset Gateway.
Each row contains the information about one Asset Gateway. Use the action bar to add or delete Asset Gateways.
Customize the Gateway configuration view
Rearrange columns
Rearrange columns in the list to the desired position via drag and drop.
Sort and filter the Gateway configuration list
Filter and sort all columns, except for the Status and Configuration columns.
Sort and filter a column
-
Sort a column by clicking on the column header. The column will be marked with an arrow. Click the arrow to toggle between descending or ascending order.
-
To filter a column, hover over the column header and click on the filter icon to open the Filter dialog.
-
The drop-down menu on the filter dialog shows available filter options.
Asset Gateway status
An Asset Gateway can have different states and status pills, described in the table below.
| Status pill | Description | Action |
|---|---|---|
| Online | Asset Gateway reached and online. | Not required. |
| Onboarding pending | Asset Gateway created but not onboarded. Configuration file valid. | Deploy Asset Gateway. For further information, refer to Administrators page. |
| Onboarding pending (expired) | Asset Gateway configuration file older than 30 min and invalid. | Recreate the configuration file in the Asset gateway details and deploy Asset Gateway. For further information, refer to Administrators page. |
| Unknown | Asset Gateway configuration file information not available. | - When connection to the Onboarding service is lost, wait for the connection to be re-established. - When Asset Gateway is created directly in the Inventory API delete the gateway and create it again via the Onboarding service. |
| Offline | Asset Gateway offline longer than 15 min. | If offline status is not intentional, check the logs of your IED and Asset Gateway. |
Access group column
Access groups help structure assets or restrict access to specific assets for certain users.
Enable the Access group column in the List settings of the Asset list to see the Access group entries for each asset.
If the Access group feature is not used, leave the Access group column entries untouched. All Asset Gateways are automatically in the default Access group.
Only users with the user_admin role can assign users to Access groups.
The Access group of an Asset Gateway can be changed by renaming it.
Note
When a new access group is created, all users in the default Access group with the user_admin role are automatically assigned to it.
For further information, refer to the Configure Access Management page.
Rename an Access group entry
- Click on the desired Access group entry.
- Enter the Access group name and press Enter.
Asset gateway details
View detailed information about any Asset Gateway in the Asset gateway details.
- Click the three dots on the far left of a row, then click View details.
- Click the three dots of a different asset to open its Asset details and close the previous one.
The Asset gateway details panel shows the following sections:
- Information: Name, ID, Access group, Description, and Last modified date.
- Connection: Configuration status with the option to create a new configuration file, the Asset Gateway version, and the Trust status.
Trust status
The Trust status of an Asset Gateway is shown in the Asset gateway details. The Trust status indicates whether the Asset Gateway is onboarded and trusted by the IAH app.
| Trust status | Description | Action |
|---|---|---|
| Established | Asset Gateway successfully onboarded and trusted by IAH. | Not required. |
| Onboarding pending | Asset Gateway not trusted by IAH. Asset Gateway created but not onboarded. Configuration file valid. | Deploy Asset Gateway. For further information, refer to Administrators page. |
| Onboarding pending (expired) | Asset Gateway not trusted by IAH. Asset Gateway not onboarded and configuration file older than 30 min and invalid. | Recreate the configuration file in the Asset gateway details and deploy Asset Gateway. For further information, refer to Administrators page. |
Asset Gateway Lifecycle
In additional to the table above, the following overview outlines the Asset Gateway lifecycle.
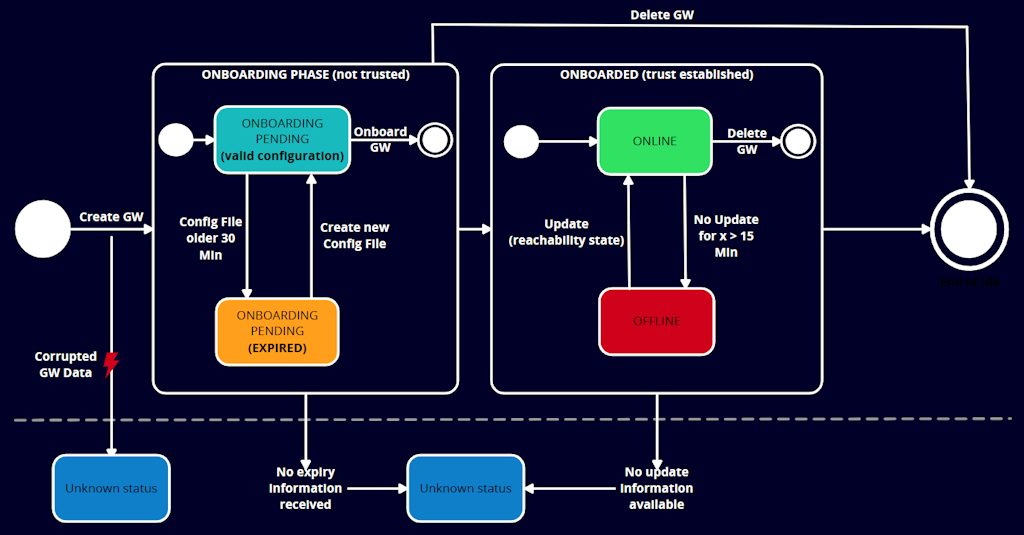
Figure: Asset Gateway lifecycle
Unknown status is shown for the following edge cases:
1) Outdated Asset Gateway version which has no heartbeat feature and can't set the reachability state.
2) The onboarding service has not responded with the required expiry information, thus it is not clear if the configuration file is still valid.
3) An asset entry has been created with type Asset Gateway, but it lacks required information (corrupted data set).
Actions on the Gateway configuration page
Select an Asset Gateway to start actions. The available actions are Add an Asset Gateway and Delete.
Action 'Add' an Asset Gateway
Adding an Asset Gateway and downloading a gateway-config file in the IAH app is the first part of the Asset Gateway deployment. The second part is the deployment of the Asset Gateway with the gateway-config file in IEM. The result of the Asset Gateway deployment is an onboarded Asset Gateway.
Creating an Asset Gateway is restricted to users with create_gateway permission, usually the Administrator of the default access group.
For further information, refer to the Setup Industrial Asset Hub page chapter 'Deploying the Asset Gateway'.
Action 'Delete'
Remove Asset Gateway(s) by selecting them and clicking the Delete button.
Deleting an Asset Gateway will:
- Remove its relation to assets discovered by the Asset Gateway (assets remain in the Asset list)
- Invalidate its certificate
- Close all active remote connections
- Cancel all pending jobs
Gateway configuration file
The Gateway configuration file (gateway-config.json) is a file that contains the necessary information for the Asset Gateway to connect with the IAH app. It is generated in the IAH app with and needs to be applied in the Asset Gateway via the IEM or added before startup for docker deployments. The generated file contains a registration token that is valid for 30 minutes. If the file is not applied within this time frame, a new file needs to be generated and deployed. But it can also be used to update the configuration of an already onboarded Asset Gateway, in case the onboarding service URL or the Asset Gateway ID has changed. In this case, there is no need for the registration token property.
Here is an overview of all properties and when they are needed:
Required properties
gatewayId, a unique identifier for the Asset Gateway entity in the IAH appxfUrl, the link to the IAH backend
For onboarding only
registrationToken, contains a temporary token used to validate the trust establishment request of the Asset Gateway
Optional properties
gatewayName, has no function but is added to support the user to apply it to the intended Asset Gateway host
Proxy configuration
httpProxyhttpsProxynoProxy
Application configuration
appConfig, contains configuration parameters for the Asset Gateway application
The generated file is created with the described optional properties in their default state. This means AppConfig with the default settings for the Default IP Scanner and proxy settings without values. Removing them will not change the onboarding result, but they are shown to show what can be configured to fit the local requirements.
Note
Keep the configuration files for the Asset Gateways in case configurations need to change later. Retrieving the configuration file later from the respective Asset Gateway via IEM is possible but requires more effort. For further information refer to the Asset Gateway issues
Examples
Example 1: Gateway configuration file with only obligational properties
{
  "gatewayId": "<gateway_id>",
  "xfUrl": "https://gateway.<region>.sws.siemens.com/api/<app_name>-<app_tenant_name>/<app_version>"
}
Example 2: Gateway configuration file with all properties
{
  "gatewayId": "<gateway_id>",
  "xfUrl": "https://gateway.<region>.sws.siemens.com/api/<app_name>-<app_tenant_name>/<app_version>",
  "registrationToken": "<jwt_token>",
  "gatewayName": "My Asset Gateway",
  "httpProxy": "http://proxy.example.com:8080",
  "httpsProxy": "https://proxy.example.com:8443",
  "noProxy": "*.example.com,localhost",
  "appConfig": {
    "myAppExample": {
      "setting1": "value1",
      "setting2": "value2"
    },
    "anotherApp": {
      "settingA": "valueA"
    }
  }
}
Processing app configurations
As it is described in example 2, the content of appConfig can be a list of several app specific configurations.
When the example is applied and the Asset Gateway app is restarted, the configuration is processed again.
During the processing of the new configuration, also the appConfig will be picked up and for each application
configuration it contains a respective file with the name <appName>-config.json will be created in the shared folder of the Asset Gateway.
To change an existing gateway configuration follow the instruction of update the asset gateway configuration.
For the example above, two files will be created: myAppExample-config.json and anotherApp-config.json.
myAppExample-config.jsonwill contain:
{
  "setting1": "value1",
  "setting2": "value2"
}
anotherApp-config.jsonwill contain:
{
  "settingA": "valueA"
}
HTTP(S) proxy configuration
To enable proxy support, adapt your downloaded or recreated gateway-config file.
Use the httpProxy, httpsProxy and noProxy fields in the gateway configuration file.
These setting have to be set right from the beginning when the Asset Gateway is onboarded, as the proxy settings are required for the onboarding process itself.
This is why the example below contains the registrationToken property.
In case the proxy settings are adapted later, there is no need for the registrationToken.
To change an existing gateway configuration follow the instruction of update the asset gateway configuration.
Example for HTTPS proxy:
{
    "gatewayId": "<gateway_id>",
    "xfUrl": "https://gateway.<region>.sws.siemens.com/api/<app_name>-<app_tenant_name>/<app_version>",
    "registrationToken": "<jwt_token>",
    "httpsProxy": "https://proxy.example.com:8080"
}
Syntax and restrictions for appConfig
- All configurations in the
appConfigobject must be valid JSON objects - The name of the configuration file created for each app will be derived from the key of the
appConfigobject. It will be in the format<appName>-config.json - The allowed length for an app name is between 1 and 128 characters
- The name must not contain any of the following characters:
/\<>:"|?*